Exploring Flexibility with the Radius NX 12×8 and Dante Modules
Finally a Part 3! Where I am with the Radius NX by Symetrix today? Somehow I have acquired five units now. Two of which have the Dante module. Stay tuned with how and why I have Dante installed in two of the units, but for now discussion is how I got to the present: Flexibility.
As I previously posted, the support for the Aphex Channel processor is less than admirable, ideal, and is down right awful. When I cannot purchase any parts, namely the power supply, nor any interest of the manufacturer, Rode (today), in even moving forward with the hardware, I needed options right away. Well, I had more Channels die on me, so the number of new Radius units went from the first test to 2, then 3, 4, and finally 5. All on-air control rooms host a Radius NX 12×8, and these studios have 4-6 mics each. I was able to justify one thing, flexibility.
I stated my plan with the obvious “instead of five individual mic processors, I can purchase a single unit and accommodate the mics, and then some…..” Yes, the cost of five individual units could be less than a Radius NX or even more, so the sweet spot was hit. I demonstrated with the first unit, and eventually the second unit, the ability to create a DSP chain that was “good enough” and possibly better than what we were using with the goal of consistency throughout the facility. Then came the purchase of a Dante module for one of the units to prove one more flexible feature, using a Radius NX in a control room as the processor for production rooms. Being a Dante plant the proof of concept was easy to setup. This is the subject of a future post.
At this point I had three units deployed, and the initial proof of concept using Dante laid out. The Aphex units were beginning to drop a bit quicker, and with this I was able to obtain units four and five, the last equipped with a Dante module. The last unit of course is installed in the room with a very picky on-air personality. It would be a lie if I said all was smooth sailing with him. My big fear was latency using a DSP unit, but that was not the issue. His complaint was it didn’t sound like the “old” processing. The answer is obviously not. When you lose features like Big Bottom© and the Aural Exciter© one will notice the difference. To counter, I now have the flexibility to try new DSP “features” and I can adjust on the fly using the Symetrix SymView. I also noted clarity as the big, and noticeable difference. So far it has been accepted.
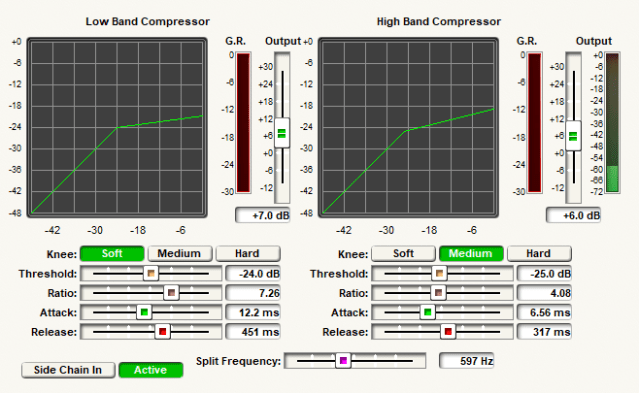
If you recall from part 2, the “channel strip” I decided to use incorporates a split compressor. I continue to experiment with this. As seen the the figure, screenshot from SymView, there is much going on here. The current setup has changed the Split Frequency, or crossover, from near 700Hz to a lower frequency. I have migrated down which has created a more full and clear upper end. This example shows 597Hz, while the target is going to be around 500Hz. The thought, and listening, is clarity basically reducing the hollowness while enhancing the compressed low end when makeup gain is applied. Any processing gurus out there have a thought? Drop a line!
I also experimented on the placement of the gate. Not the best screenshot, but I placed the gate after the dual compressor and deesser. I decided on this after experimenting on the best way to create the Aphex gate without having all that fun logic control. The gate operates in side chain mode, so is based on the level of the signal after the high pass filter not the compressed plus makeup gain of the compressor. Once the signal level breaks the threshold, the gate is immediate and cleanly passes the processed audio to the EQ stage.

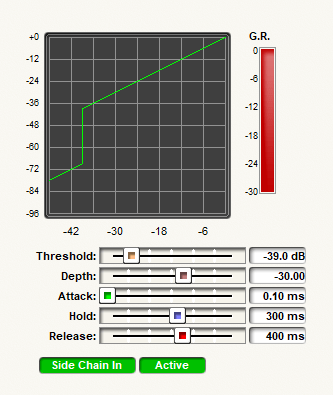
The settings of the gate are shown in the image above. Where did I get these? My knowledge of the Aphex plus homework. These are the processing settings of the Aphex minus the logic control, so this is what the logic control operates. By locating the gate where I did, and using the uncompressed audio to trigger it, somewhat duplicates the operation of the Aphex gate.
Finally I will admit there is a learning curve to get the optimum levels through the system, and the channel strip DSP in the figure shows one of them. The mics directly connected are using the analog inputs, and are located in the control room. These use the the pre-amp of the Radius NX for gain match and control. What you see in the figure above is a voice booth in which the processors died and I needed a quick solution. The details will be in part 4 and the Dante discussion. Here I am using basic processor as the mic pre-amp and phantom power located in the voice studio. I was able to get a decent gain across the network, Dante, to the Radius NX. To maintain as little effects from the unit being used as a pre-amp, I had to reduce that to bare minimums, and I inserted a gain stage in my DSP. Flexibility! It turned out the immediate use of this room was a visitor from another market. This arrangement worked, the talent was none the wiser, and actually was quite pleased with the setup. And, no complaint on latency.
Having a bit of flexibility in your system does pay off in the end. I always incorporate some level of flexibility in my studio designs, audio chains, or wherever I think I can use it as long as it does not degrade performance. This quick solution for our voice booth, and second test of proof of concept for using Dante for microphones, once again confirms this design concept is valid. Be flexible and have fun experimenting! Next time, details on incorporating Dante into the mix. Cheers!
