Archive
Optimizing Mic Processing with Radius NX
This is to follow-up on my previous posts. Yes, we are still using the Radius NX for mic processing. Just this past week after much research and testing, I have created a DSP that sounds crisp, clean, and loud. No secrets revealed here, but I will say that it took some homework and learning the nuances of what to use. The ultimate goal is to match, or come close, to the Aphex 230 and Channel. I think came close as I quote an air talent “LOVE the sound of the mic”. I’m taking the win.
I specifically dialed in the DSP with the Neumann BCM-104 microphone. As previously posted I continue to use the Split Compressor from the dynamics as this brings out the custom clarity without allowing too much squash, or passing levels that would clip. Yes, there will be some minor tuning for each studio, and maybe position, but the starting point is way beyond what I initially expected especially when moving DSP elements around.
I must admit tweaking is fun, sometimes frustrating, and pretty satisfying when you can hit a goal. Remember to use baby steps before diving in with the big change. Now I wish some manufacturers would include some of the dynamics I was able to utilize in the Symetrix. Speaking of Symetrix, I see they are introducing a new distributive solution, Cognio. Maybe we will get to play with that. For those able to attend NAB, enjoy! With all the changes around here, another year, another missed trip.
Cheers!
Cost-Effective Dante Mic Preamps: Shure ANI4IN Insights
The Dante enabled mic preamps arrived! As the title says, I am trying out the Shure ANI4IN-XLR. The concept was to find a device that was budget friendly as we are really in a test stage as we mentioned in the last post. Here we take the proof of concept to a fully operational installation. I have two Symetrix Radius NX units with Dante, I purchased two Shure ANI4IN units. I designated four production rooms to use one Radius, and three production rooms for the other unit. Let the fun begin!
As all the proof of concepts worked, don’t tell anyone, but I purchased two Dante enabled mic preamps. Of course cost was a consideration for such a feat, so after research, the unit I decided on is the Shure ANI4IN, as mentioned. This is the point were the full concept is deployed with two production studios with the future laid out for the other rooms as the old mic preamps die. Since all the legwork was discussed earlier, this is one short little article.
The Shure device is an input device only, so it is quite interesting to see it only in the Transmitter side of life, especially after training ones mind for Receive. Yet, since we only really concern ourselves with receive, it makes sense. How was that for a circuitous thought? I may need more coffee. The devices require power over ethernet (PoE) which concerns me a bit, but made it easy to install, especially since our switch used has PoE enabled. The preamp give me the ability to assign names for each transmit channel, allows for phantom power (required for me), mic gain range with trim, and even processing if one needs it. All is configured through the web GUI.
On the Symetrix side I could have the Radius NX manage the subscriptions, but to be consistent with our plant, I have Dante Controller managing all subscriptions at this time. I have tested the Radius managing and it works well, so in the future as devices become more intelligent I may start doing this sort of thing. Once the subscriptions were made, I had audio passing and it was time to fine tune gain structure and processing. Working in the DSP world, the gain structure has been a bit of a challenge. I spent some time adjusting the initial input gain. I ran into this with the proof of concept installs, and the original Radius NX installation. Once the input gain was dialed in, and the processing DSP was set, I as curious about the latency. On average the receive latency on the Radius NX from the Shure ANI4IN is only 375 usec. You see that? Microseconds. The receive latency, on average, on the SAS Bravo from the Radius NX is only 354 usec. Needless to say, latency is not an issue. What I really should do is do a test setup to measure the latency from input to output with all the DSP in use, but since I do not notice it, and no users have mentioned it, the need is not necessary. I consider this a success.
Needless to say, not everything was as smooth sailing as it appears. This was due to me overlooking the obvious when installing the Shure. The big “DOH” moment came after spending a bit of time, and emails, wondering why the subscriptions did not stick, and random anomalies with Dante Controller even noticing the devices were online. What made it more baffling, and a good thing, was audio was passing with out an issue. So after a swift kick to my head by a second set of eyes, I overlooked the fact that the Shure ANI has two configurations under network settings; one for control, and one for Dante. I stupidly assigned the same IP address to each! Don’t do that! We all have our moments, right? Once resolved all fell into place accordingly. Lesson learned, once again, to always check your work.
As I move forward I am going to keep my eyes open for various, cost effective mic preamps. Four production rooms will need a solution, so I may have reason to test others, but I am very satisfied with the Shure ANI4IN. There you go, a short end to the mic preamp conundrum which some of us face in this modern era.
Till some other odd topic, or if you have a suggestion, drop a line. Cheers!
Dante Integration: Flexibility in Radius NX Systems
Part 4: The Radius NX and Dante. How and Why.
As mentioned in the last post I installed a Dante module into one of my Symetrix Radius NX 12×8 units, and I requested the module when I ordered the fifth unit. Dante is my primary audio routing between studios and the TOC (technical operating center), also known by industry folk as the shop. This is all fed into a four frame SAS 32KD. Dante is also used between studios as necessary. If I take a peak at my Dante Controller, there are now 70 devices on the AoIP network. Surely this explains why the addition of the Dante modules. The other reason goes back to the previous post, flexibility. The justification of purchasing the Radius NX 12×8 units included using them for processing the mics located in production studios in addition to the on-air control rooms.
As flexibility was key to installing the Radius NX units, the concept for expanding on the normal installation to a more complex and flexible system became apparent. I can save money by using the units to their full extent. Companies like the phrase “save money”. Do not get me started on companies and their lack of interest in a sound infrastructure. (Unintended pun there!) Saving money was also key in the long term knowing that I have many other Aphex Channels which will or have failed in the last few months, and it is not worth the time and effort to repair or build new power supplies for them. Incorporating a Dante module, a Brooklyn III, expands the Radius NX to an addition 64 channels of I/O (Inputs and outputs). What does one do with that additional I/O? Add production room mics!

The initial proof of concept arose from the fact units were failing and the replacement units stack was thinning. I requested the purchase of a Dante module to demonstrate the concept, though at first was very basic. The purchase goes through Symetrix so the module is prepared for their device, plus they test them and install the firmware if it is modified for their individual device. Note that some manufacturers do not need to modify, while many make sure they work with their APIs. Once the module arrived, it was time for the installation.
Installation was actually very easy. The Radius NX has a slot conveniently located under the unit cover. In the slot is an existing time clock module which gets removed and replaced with the Dante module. Upon power up, the hardware was happy and looking good, so back in the rack it went. In the Symetrix Composer the hardware was discovered, but I had some issues with the configuration of the I/O. First step in such troubleshooting is to verify software versions, and sure enough there was a new version of Composer online. After the update everything appeared as expected. I use this these situations as learning and experience since purchasing a unit with everything installed and working does not give one the full experience.
Configuring the module was not too bad. Just a little learning curve. I did learn that configuring the receive through the properties within Composer will recreate the Dante cross point if the unit is down for any reason. As I moved forward I also discovered through documents online through Symetrix one does not need to do this by unchecking a checkbox. The reason will be discussed later. I do like both methods, and going back to letting Dante Controller do its job at my location seems to be the solution. The device receiving from the Radius NX cross point is created within the Dante Controller, and that works as expected like any other Dante cross point configuration.
The proof of concept test was done without using a microphone as it was the most basic of tests. In addition it gave me a chance to quickly look at the SAS Bravo and their internal processing/FX capabilities. The test block diagram shows how basic the test was, and represents the next level for a microphone. It is basically the SAS Bravo sending audio to the Radius NX, and the Radius NX sending back to the Bravo after processing. I looked how easy was it to setup, and how noticeable was the latency, if any. According to the Dante Controller, the latency from the Bravo to the Radius on average is 342 microseconds. The other way is 352 microseconds. The round trip with DSP comes under 1ms. Listening to the test audio and a quick, though double processed, mic test, the audio was listenable. If there was latency issues, the average person would not notice.
Then a couple of weeks ago we had an “oh S*&t” moment. A visit from another market needed to go on air from our facilities. The obvious choice is the voice booths setup for such situations along with remote voice tracking. I discovered that yet another pair of Aphex Channels had passed away. Well, with what I had on hand I took the situation and decided to take the proof of concept to the next level. Though I did not have a Dante enabled mic pre-amp, of which I have two on order now, I knew I could use an existing basic mic processor as a pre-amp with all processing disabled, route that to my SAS frame, and send it to a Radius NX via Dante. Then bring back the source to the studio. Here I was concerned that latency may become an issue due to the path and conversions. After some tweaking, I was satisfied this will fly, and in the worst case scenario we would move to another studio. The show ran without a hitch, and the talent did not have any issues. He was actually impressed how smoothly all went. He never knew his mic was being processed two rooms away.
The concept works. Next will be the installation of the Dante enabled mic preamps. They are on the way, so we will know soon!
Exploring Flexibility with the Radius NX 12×8 and Dante Modules
Finally a Part 3! Where I am with the Radius NX by Symetrix today? Somehow I have acquired five units now. Two of which have the Dante module. Stay tuned with how and why I have Dante installed in two of the units, but for now discussion is how I got to the present: Flexibility.
As I previously posted, the support for the Aphex Channel processor is less than admirable, ideal, and is down right awful. When I cannot purchase any parts, namely the power supply, nor any interest of the manufacturer, Rode (today), in even moving forward with the hardware, I needed options right away. Well, I had more Channels die on me, so the number of new Radius units went from the first test to 2, then 3, 4, and finally 5. All on-air control rooms host a Radius NX 12×8, and these studios have 4-6 mics each. I was able to justify one thing, flexibility.
I stated my plan with the obvious “instead of five individual mic processors, I can purchase a single unit and accommodate the mics, and then some…..” Yes, the cost of five individual units could be less than a Radius NX or even more, so the sweet spot was hit. I demonstrated with the first unit, and eventually the second unit, the ability to create a DSP chain that was “good enough” and possibly better than what we were using with the goal of consistency throughout the facility. Then came the purchase of a Dante module for one of the units to prove one more flexible feature, using a Radius NX in a control room as the processor for production rooms. Being a Dante plant the proof of concept was easy to setup. This is the subject of a future post.
At this point I had three units deployed, and the initial proof of concept using Dante laid out. The Aphex units were beginning to drop a bit quicker, and with this I was able to obtain units four and five, the last equipped with a Dante module. The last unit of course is installed in the room with a very picky on-air personality. It would be a lie if I said all was smooth sailing with him. My big fear was latency using a DSP unit, but that was not the issue. His complaint was it didn’t sound like the “old” processing. The answer is obviously not. When you lose features like Big Bottom© and the Aural Exciter© one will notice the difference. To counter, I now have the flexibility to try new DSP “features” and I can adjust on the fly using the Symetrix SymView. I also noted clarity as the big, and noticeable difference. So far it has been accepted.
If you recall from part 2, the “channel strip” I decided to use incorporates a split compressor. I continue to experiment with this. As seen the the figure, screenshot from SymView, there is much going on here. The current setup has changed the Split Frequency, or crossover, from near 700Hz to a lower frequency. I have migrated down which has created a more full and clear upper end. This example shows 597Hz, while the target is going to be around 500Hz. The thought, and listening, is clarity basically reducing the hollowness while enhancing the compressed low end when makeup gain is applied. Any processing gurus out there have a thought? Drop a line!
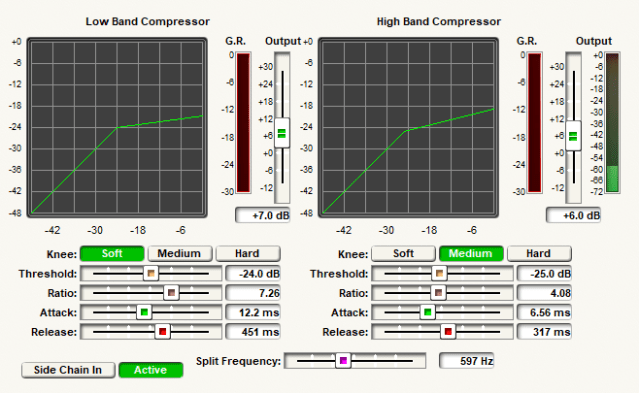
I also experimented on the placement of the gate. Not the best screenshot, but I placed the gate after the dual compressor and deesser. I decided on this after experimenting on the best way to create the Aphex gate without having all that fun logic control. The gate operates in side chain mode, so is based on the level of the signal after the high pass filter not the compressed plus makeup gain of the compressor. Once the signal level breaks the threshold, the gate is immediate and cleanly passes the processed audio to the EQ stage.

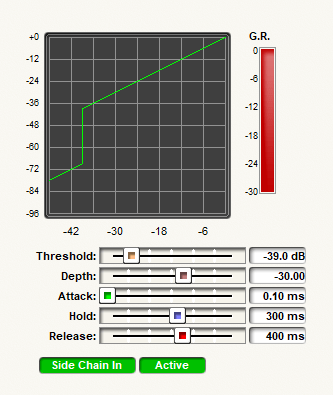
The settings of the gate are shown in the image above. Where did I get these? My knowledge of the Aphex plus homework. These are the processing settings of the Aphex minus the logic control, so this is what the logic control operates. By locating the gate where I did, and using the uncompressed audio to trigger it, somewhat duplicates the operation of the Aphex gate.
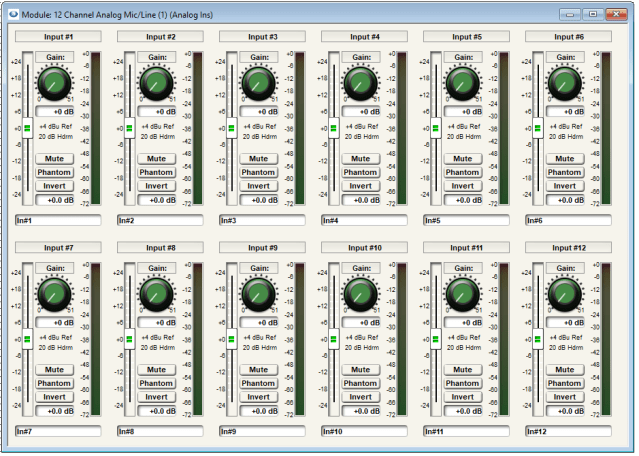
Finally I will admit there is a learning curve to get the optimum levels through the system, and the channel strip DSP in the figure shows one of them. The mics directly connected are using the analog inputs, and are located in the control room. These use the the pre-amp of the Radius NX for gain match and control. What you see in the figure above is a voice booth in which the processors died and I needed a quick solution. The details will be in part 4 and the Dante discussion. Here I am using basic processor as the mic pre-amp and phantom power located in the voice studio. I was able to get a decent gain across the network, Dante, to the Radius NX. To maintain as little effects from the unit being used as a pre-amp, I had to reduce that to bare minimums, and I inserted a gain stage in my DSP. Flexibility! It turned out the immediate use of this room was a visitor from another market. This arrangement worked, the talent was none the wiser, and actually was quite pleased with the setup. And, no complaint on latency.
Having a bit of flexibility in your system does pay off in the end. I always incorporate some level of flexibility in my studio designs, audio chains, or wherever I think I can use it as long as it does not degrade performance. This quick solution for our voice booth, and second test of proof of concept for using Dante for microphones, once again confirms this design concept is valid. Be flexible and have fun experimenting! Next time, details on incorporating Dante into the mix. Cheers!
Quick Update
I love it when the application asks “what’s on your mind?”
I’ll tell you what’s on my mind: Has it been that long since I posted! Crazy. Busy? Pretty much. Between life and family, and work, it has been busy.
Symetrix update: I have four Symetrix Radius-NX units now. I just installed a Dante module in one for the next test in the works. Looking for a decent, yet not too expensive, Dante enabled mic preamp for the test. I’ve adjusted settings, so maybe I need to update what I like and dislike.
Aphex: I still get emails regarding the Aphex 230 and Channel. Yes, the power supplies continue to drop off, and thus the above update of 4 units now. No power supplies are available as far as I know. Rode is not helpful on discrete hardware. They still support the Aphex product within their devices like the Rodecaster. I have pretty much placed the Aphex branded hardware on my do not buy list until I know someone will continue enhancing the technology and supporting the hardware.
Burk Technology: I have installed and updated to the latest version of the ARC Plus Touch firmware, Autoload, and Autopilot. I was the first in our company to do so, and I continue to test intermediate releases. I am pretty happy with how our remote control system is working, and we continue to work out bugs.
Wegner ACP satellite receiver: I am providing information to WW1 and Wegner on random relay occurrences. Random is the key word.
And I can go on, but now I need to focus. I think I’ll pursue a Symetrix update soon. I may even try that new NotebookLM by our Google friends. LLM AI is taking over everything, so maybe I’ll poke at that a bit.
Cheers!
Symetrix Radius NX 12×8 Part 2
Well, the holidays are upon us. Thanksgiving has flown by. How about some light reading. The Radius NX has been on the air on two stations for a few months now. No complaints. I do continue to think of ways to improve the sound, but if it works, lets not play too much, right?
I introduced the Symetrix in a previous post and here we will discuss the overall configuration of the unit. No this is not a box you just plug in and play like a discrete unit. This is a configurable DSP unit, so you need the tools to make it work. A drawback to modern technology and its flexibility is it requires the tools to do it. In the case of Symetrix their CAD like program is Composer. I started BEFORE I even received the hardware by downloading Composer from their site. This way I was able to poke and prod and start to learn what needs to be done.
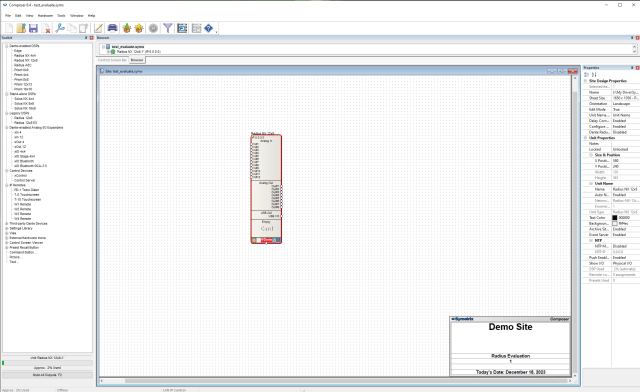
As seen in the image, the workspace is very CAD-like which does make sense if you ponder it. The left side provides a toolkit. At the start you choose the DSP device of which to program. In my case the DSP is the Radius NX 12×8. Drag and drop in the workspace. Alternate click, aka Right-Click, and the basics of the device can be configured. I want to give a full tutorial, but really this is an overview. If you wish a more detailed description, or a tutorial type posting, please send a note and I can pursue a new site section for the crowd.
Moving on, double-click the DSP in the workspace opens the DSP configuration. This is the design view. Now the world of options opens up for you. The toolkit on the right changes with a number of DSP options or plug-ins to use. Many audio related, many facilities related. Remember Symetrix provides for the AV world and conference centers and business conference rooms are a big part of their business. As we are concentrating on broadcast studio use, we do not use the like of Loudspeaker management or Conferencing and paging.
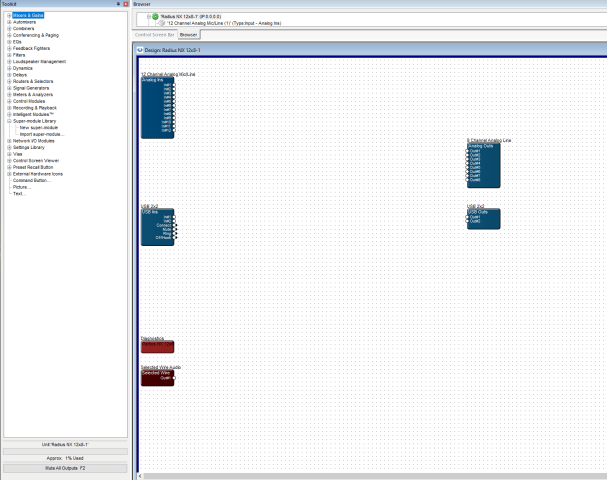
You will also see the basics of the DSP unit, input and output “blocks”, and it will show Dante and AES if such options are installed. Open the Analog Ins by double clicking, same with the Analog Outs, and you see the controls for the I/O. From the toolkit you drag and drop in the modules, or blocks, which you wish to use.

I learned early on that designing from here can get quite messy. Just think of the modules you can have in this screen! After research, and around this time I was in contact with Symetrix, I learned about the Super-Module. Think of this as your container with the necessary, lets call them sub-modules, you wish to use in one package. In our case, we have 5 to 6 microphones in a control room, so if you did not create a super-module, you would have that many processing chains in this main design view, and what a view that would be. Package that into a super-module, then you see one of those, open that module up, and you build your chains out within that.
The next screenshot is after dropping in and configuring a new Super Module. Within this the audio I/O is filled based on the number of I/O you configure when creating it. Here we see 8 in and 8 out. Then you drag and drop the modules you wish to use; compressor, EQ, filters, and whatever complex stuff you wish to configure. Copy and paste? Yes. Makes things go faster, and if you have start-point settings, configure those first, then copy and past. Talk about saving time!

Once you add the audio path lines and save it all, you get audio in and audio out. The input gain and output trim interface with your external equipment, but once your audio is in, the DSP is all floating point, so there is almost unlimited gain. Just do not go crazy. I do the old fashioned approach by setting up my input and output, then make my changes to align with the external world after adjustment of the details.
Here is an EQ example. A specialty filter, or basically a pre-configured EQ module as you can build one yourself. All the settings are done for you and you can choose the type of EQ at each stage. This guy is a 5-band EQ. As you can see this becomes quite customizable.
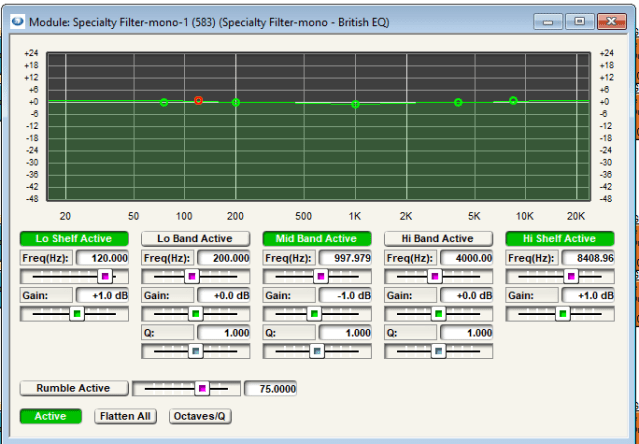

That second image is a dual compressor/limiter that I have found to play with. Again a pre-loaded module. Easy to configure. Graphical. Note many of these modules have a side chain input. Use a different audio point to activate the module is pretty cool. Modules also have control inputs and those are used if you have zones and other types of controls to activate, etc. Not important, per se, to broadcast.
Once all this is done, you save it and upload it to the unit. If you have multiple units, you choose which one it goes to. Afterwards you can use Composer to make adjustments when you connect again. If you wish, you can save these “views” in SymView. When you run that, you connect directly and you have real-time changes without having to get into Composer. I for this I basically dropped, or exported, the settings to the SymView design.

After getting over that learning curve, which I will admit was daunting to start before having the hardware in hand, it became quite easy to navigate and move around. When I received our second unit, I had it up and running in no time. So far the talent in the studios that have a Symetrix NX in it have not complained. If asked for an adjustment, I am able to open the SymView for that installation and play. What worked out so well is I had it on my laptop. Walked into the room and had him yap while monitoring the appropriate bus, made a couple tweaks, and done. If you have remote access to your network, or a computer on the network, you can do these changes remotely, too. I have not been asked, but that day will come. At this point, if you are looking for a good unit with features galore, you can replace a number of single purpose boxes with a very versatile unit, I recommend the Symetrix. I feel I have come full circle when there was a time I had the trusted 528e.
Cheers!
Mic Processing Move: Welcome the Symetrix Radius 12×8
A few months back I mentioned we have moved some of our microphone processing from the Aphex Channel to a Symetrix Radius 12×8. I appreciate the patience you all exhibited while I juggled work, site migration, and whatever else life threw at me to finally get this, I should say these, posts rolling. Yes, these, as it will be best to provide you with a 3 or 4 post series on this migration from one manufacturer and technology to another. This first installment will give you the why and how the decision was made. After this comes the technical details and the meat that makes doing these things so much fun. Time to get things started with the “why” and WTF!
A reminder as it has been a while; since Rode purchased Aphex, support for the hardware has been poor, and quality control has gone downhill, too. This is the driving factor for moving on. I had a set of criteria before even looking at alternatives to the Aphex Channel. First a mic processing channel for me MUST have a noise gate, or some expander/gate. I did not want to budge on this one, nor have any demo unit passed this test. The second criteria was the unit required an AES, digital, output. I had to relax this requirement, though the Symetrix does give me an option. More on that in another installment. One must always be willing to compromise when faced with minimal alternatives.
How did I find this unit? Research. Lots of research. As we started to see more power supply failures on the Aphex units, pressure increased to find alternatives. The gate situation was becoming a sticking point. As Symetrix used to make a fine voice processor in the 528E, I poked into their website, here, and found a whole new world of devices. All are DSP based. I downloaded the software, Composer, used to configure these units. I learned a bit more. I contacted my preferred equipment vendor, Broadcasters General Store(name drop), and we started the inquiry process. It was slow to start, but once I was able to chat with a human at Symetrix, the details started to become clear. I was intrigued. Why not DSP? As I was having no luck with stand-alone units, I requested a demo. I originally asked for a Symetrix Prism, but a Radius 12×8 was available, so I went that route.

The hardware is deceptive and intimidating if you are expecting knobs, menus, meters, etc. As the picture shows, the hardware is just that, a chassis with some guts, and the guts need to be told what to do. I am glad I at least poked at the Composer software prior to having the physical unit here. I then had a great conversation with Stu at Symetrix. The chat gave me the necessary areas to focus on and details on what my end goals were. The Radius comes with analog and USB I/O be default, and the flavors are 4×4 and 12×8. I have the 12×8 because I have rooms with 5 to 6 mics. In addition, one can purchase the digital output module and/or a Dante module if you wish to go AoIP. I am considering adding the Dante module to a unit, the why to be discussed in a later installment. The digital output only gives 4 channels, so for a 5 to 6 mic room it is best to stay with analog.
After a few weeks of learning and playing with the Composer software, I had a multi-mic processor in a production studio for real use evaluation. Setting this up does take some learning, and the bottom line is it is a “process”. You start with a site. You add the hardware component, in this case a Radius 12×8. You then create a design which is the guts. I learned about super-modules. I learned the different filters and dynamics that are available. I ignored the items in the toolkit which refer to conferencing, control surfaces, and mixers. Yes, you may say overkill for just a processor, but as you will see in the next installment, the fine tuning and tweaking flexibility does pay off. When all was tested in the production room, I had a concept mic channel with the desired stages ready for on air. I will admit when I purchased our second unit I changed a couple items in the chain which seems to have improved on my original concept. I now have a mic channel strip copied to 8, so each mic is able to be configured individually, and using SymView, I do not need to be connected to Composer for minor tweaks. My DSP channel is basic in terms of the basics: after the input where levels are set, I have the high-pass filter, compressor, de-esser, expander/gate, and EQ as one would expect from a stand-alone processor.
The Symetrix Radius has been on the air now for a few months, and I have received positive feedback. I learned the Radius comes with a better mic pre-amp than the Prism, so that factored into the decision. The unit provides phantom power as I use Neumann BCM-104 microphones. Did it take time to learn? Yes. Is it the same as an Aphex Channel? No. Does it sound clean? Yes. Other factors that were a concern was how well the DSP compressor works, how to deal with make-up gain, and latency through the unit. The former concerns are minor as we know how to make the appropriate adjustments. The latter was a bit more concerning, but once on air, it is not. It depends on how you build your stages and how much DSP is being used. The next installment will describe how I used Composer and built the stages, with screenshots, as an example of what the learning curve involves. I must say I like the flexibility, and DSP can be your friend.
