Archive
Cost-Effective Dante Mic Preamps: Shure ANI4IN Insights
The Dante enabled mic preamps arrived! As the title says, I am trying out the Shure ANI4IN-XLR. The concept was to find a device that was budget friendly as we are really in a test stage as we mentioned in the last post. Here we take the proof of concept to a fully operational installation. I have two Symetrix Radius NX units with Dante, I purchased two Shure ANI4IN units. I designated four production rooms to use one Radius, and three production rooms for the other unit. Let the fun begin!
As all the proof of concepts worked, don’t tell anyone, but I purchased two Dante enabled mic preamps. Of course cost was a consideration for such a feat, so after research, the unit I decided on is the Shure ANI4IN, as mentioned. This is the point were the full concept is deployed with two production studios with the future laid out for the other rooms as the old mic preamps die. Since all the legwork was discussed earlier, this is one short little article.
The Shure device is an input device only, so it is quite interesting to see it only in the Transmitter side of life, especially after training ones mind for Receive. Yet, since we only really concern ourselves with receive, it makes sense. How was that for a circuitous thought? I may need more coffee. The devices require power over ethernet (PoE) which concerns me a bit, but made it easy to install, especially since our switch used has PoE enabled. The preamp give me the ability to assign names for each transmit channel, allows for phantom power (required for me), mic gain range with trim, and even processing if one needs it. All is configured through the web GUI.
On the Symetrix side I could have the Radius NX manage the subscriptions, but to be consistent with our plant, I have Dante Controller managing all subscriptions at this time. I have tested the Radius managing and it works well, so in the future as devices become more intelligent I may start doing this sort of thing. Once the subscriptions were made, I had audio passing and it was time to fine tune gain structure and processing. Working in the DSP world, the gain structure has been a bit of a challenge. I spent some time adjusting the initial input gain. I ran into this with the proof of concept installs, and the original Radius NX installation. Once the input gain was dialed in, and the processing DSP was set, I as curious about the latency. On average the receive latency on the Radius NX from the Shure ANI4IN is only 375 usec. You see that? Microseconds. The receive latency, on average, on the SAS Bravo from the Radius NX is only 354 usec. Needless to say, latency is not an issue. What I really should do is do a test setup to measure the latency from input to output with all the DSP in use, but since I do not notice it, and no users have mentioned it, the need is not necessary. I consider this a success.
Needless to say, not everything was as smooth sailing as it appears. This was due to me overlooking the obvious when installing the Shure. The big “DOH” moment came after spending a bit of time, and emails, wondering why the subscriptions did not stick, and random anomalies with Dante Controller even noticing the devices were online. What made it more baffling, and a good thing, was audio was passing with out an issue. So after a swift kick to my head by a second set of eyes, I overlooked the fact that the Shure ANI has two configurations under network settings; one for control, and one for Dante. I stupidly assigned the same IP address to each! Don’t do that! We all have our moments, right? Once resolved all fell into place accordingly. Lesson learned, once again, to always check your work.
As I move forward I am going to keep my eyes open for various, cost effective mic preamps. Four production rooms will need a solution, so I may have reason to test others, but I am very satisfied with the Shure ANI4IN. There you go, a short end to the mic preamp conundrum which some of us face in this modern era.
Till some other odd topic, or if you have a suggestion, drop a line. Cheers!
Dante Integration: Flexibility in Radius NX Systems
Part 4: The Radius NX and Dante. How and Why.
As mentioned in the last post I installed a Dante module into one of my Symetrix Radius NX 12×8 units, and I requested the module when I ordered the fifth unit. Dante is my primary audio routing between studios and the TOC (technical operating center), also known by industry folk as the shop. This is all fed into a four frame SAS 32KD. Dante is also used between studios as necessary. If I take a peak at my Dante Controller, there are now 70 devices on the AoIP network. Surely this explains why the addition of the Dante modules. The other reason goes back to the previous post, flexibility. The justification of purchasing the Radius NX 12×8 units included using them for processing the mics located in production studios in addition to the on-air control rooms.
As flexibility was key to installing the Radius NX units, the concept for expanding on the normal installation to a more complex and flexible system became apparent. I can save money by using the units to their full extent. Companies like the phrase “save money”. Do not get me started on companies and their lack of interest in a sound infrastructure. (Unintended pun there!) Saving money was also key in the long term knowing that I have many other Aphex Channels which will or have failed in the last few months, and it is not worth the time and effort to repair or build new power supplies for them. Incorporating a Dante module, a Brooklyn III, expands the Radius NX to an addition 64 channels of I/O (Inputs and outputs). What does one do with that additional I/O? Add production room mics!

The initial proof of concept arose from the fact units were failing and the replacement units stack was thinning. I requested the purchase of a Dante module to demonstrate the concept, though at first was very basic. The purchase goes through Symetrix so the module is prepared for their device, plus they test them and install the firmware if it is modified for their individual device. Note that some manufacturers do not need to modify, while many make sure they work with their APIs. Once the module arrived, it was time for the installation.
Installation was actually very easy. The Radius NX has a slot conveniently located under the unit cover. In the slot is an existing time clock module which gets removed and replaced with the Dante module. Upon power up, the hardware was happy and looking good, so back in the rack it went. In the Symetrix Composer the hardware was discovered, but I had some issues with the configuration of the I/O. First step in such troubleshooting is to verify software versions, and sure enough there was a new version of Composer online. After the update everything appeared as expected. I use this these situations as learning and experience since purchasing a unit with everything installed and working does not give one the full experience.
Configuring the module was not too bad. Just a little learning curve. I did learn that configuring the receive through the properties within Composer will recreate the Dante cross point if the unit is down for any reason. As I moved forward I also discovered through documents online through Symetrix one does not need to do this by unchecking a checkbox. The reason will be discussed later. I do like both methods, and going back to letting Dante Controller do its job at my location seems to be the solution. The device receiving from the Radius NX cross point is created within the Dante Controller, and that works as expected like any other Dante cross point configuration.
The proof of concept test was done without using a microphone as it was the most basic of tests. In addition it gave me a chance to quickly look at the SAS Bravo and their internal processing/FX capabilities. The test block diagram shows how basic the test was, and represents the next level for a microphone. It is basically the SAS Bravo sending audio to the Radius NX, and the Radius NX sending back to the Bravo after processing. I looked how easy was it to setup, and how noticeable was the latency, if any. According to the Dante Controller, the latency from the Bravo to the Radius on average is 342 microseconds. The other way is 352 microseconds. The round trip with DSP comes under 1ms. Listening to the test audio and a quick, though double processed, mic test, the audio was listenable. If there was latency issues, the average person would not notice.
Then a couple of weeks ago we had an “oh S*&t” moment. A visit from another market needed to go on air from our facilities. The obvious choice is the voice booths setup for such situations along with remote voice tracking. I discovered that yet another pair of Aphex Channels had passed away. Well, with what I had on hand I took the situation and decided to take the proof of concept to the next level. Though I did not have a Dante enabled mic pre-amp, of which I have two on order now, I knew I could use an existing basic mic processor as a pre-amp with all processing disabled, route that to my SAS frame, and send it to a Radius NX via Dante. Then bring back the source to the studio. Here I was concerned that latency may become an issue due to the path and conversions. After some tweaking, I was satisfied this will fly, and in the worst case scenario we would move to another studio. The show ran without a hitch, and the talent did not have any issues. He was actually impressed how smoothly all went. He never knew his mic was being processed two rooms away.
The concept works. Next will be the installation of the Dante enabled mic preamps. They are on the way, so we will know soon!
Exploring Flexibility with the Radius NX 12×8 and Dante Modules
Finally a Part 3! Where I am with the Radius NX by Symetrix today? Somehow I have acquired five units now. Two of which have the Dante module. Stay tuned with how and why I have Dante installed in two of the units, but for now discussion is how I got to the present: Flexibility.
As I previously posted, the support for the Aphex Channel processor is less than admirable, ideal, and is down right awful. When I cannot purchase any parts, namely the power supply, nor any interest of the manufacturer, Rode (today), in even moving forward with the hardware, I needed options right away. Well, I had more Channels die on me, so the number of new Radius units went from the first test to 2, then 3, 4, and finally 5. All on-air control rooms host a Radius NX 12×8, and these studios have 4-6 mics each. I was able to justify one thing, flexibility.
I stated my plan with the obvious “instead of five individual mic processors, I can purchase a single unit and accommodate the mics, and then some…..” Yes, the cost of five individual units could be less than a Radius NX or even more, so the sweet spot was hit. I demonstrated with the first unit, and eventually the second unit, the ability to create a DSP chain that was “good enough” and possibly better than what we were using with the goal of consistency throughout the facility. Then came the purchase of a Dante module for one of the units to prove one more flexible feature, using a Radius NX in a control room as the processor for production rooms. Being a Dante plant the proof of concept was easy to setup. This is the subject of a future post.
At this point I had three units deployed, and the initial proof of concept using Dante laid out. The Aphex units were beginning to drop a bit quicker, and with this I was able to obtain units four and five, the last equipped with a Dante module. The last unit of course is installed in the room with a very picky on-air personality. It would be a lie if I said all was smooth sailing with him. My big fear was latency using a DSP unit, but that was not the issue. His complaint was it didn’t sound like the “old” processing. The answer is obviously not. When you lose features like Big Bottom© and the Aural Exciter© one will notice the difference. To counter, I now have the flexibility to try new DSP “features” and I can adjust on the fly using the Symetrix SymView. I also noted clarity as the big, and noticeable difference. So far it has been accepted.
If you recall from part 2, the “channel strip” I decided to use incorporates a split compressor. I continue to experiment with this. As seen the the figure, screenshot from SymView, there is much going on here. The current setup has changed the Split Frequency, or crossover, from near 700Hz to a lower frequency. I have migrated down which has created a more full and clear upper end. This example shows 597Hz, while the target is going to be around 500Hz. The thought, and listening, is clarity basically reducing the hollowness while enhancing the compressed low end when makeup gain is applied. Any processing gurus out there have a thought? Drop a line!
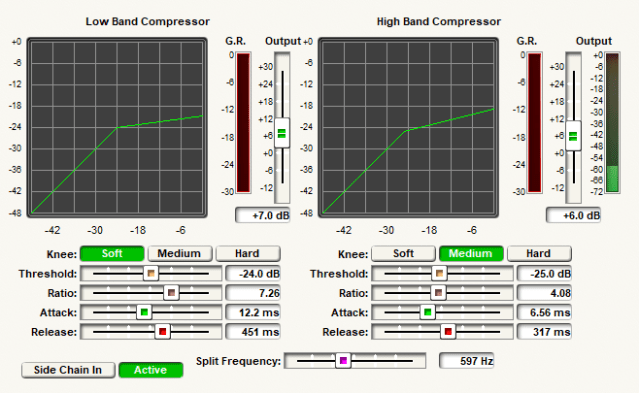
I also experimented on the placement of the gate. Not the best screenshot, but I placed the gate after the dual compressor and deesser. I decided on this after experimenting on the best way to create the Aphex gate without having all that fun logic control. The gate operates in side chain mode, so is based on the level of the signal after the high pass filter not the compressed plus makeup gain of the compressor. Once the signal level breaks the threshold, the gate is immediate and cleanly passes the processed audio to the EQ stage.

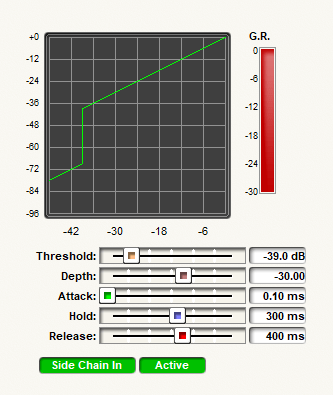
The settings of the gate are shown in the image above. Where did I get these? My knowledge of the Aphex plus homework. These are the processing settings of the Aphex minus the logic control, so this is what the logic control operates. By locating the gate where I did, and using the uncompressed audio to trigger it, somewhat duplicates the operation of the Aphex gate.
Finally I will admit there is a learning curve to get the optimum levels through the system, and the channel strip DSP in the figure shows one of them. The mics directly connected are using the analog inputs, and are located in the control room. These use the the pre-amp of the Radius NX for gain match and control. What you see in the figure above is a voice booth in which the processors died and I needed a quick solution. The details will be in part 4 and the Dante discussion. Here I am using basic processor as the mic pre-amp and phantom power located in the voice studio. I was able to get a decent gain across the network, Dante, to the Radius NX. To maintain as little effects from the unit being used as a pre-amp, I had to reduce that to bare minimums, and I inserted a gain stage in my DSP. Flexibility! It turned out the immediate use of this room was a visitor from another market. This arrangement worked, the talent was none the wiser, and actually was quite pleased with the setup. And, no complaint on latency.
Having a bit of flexibility in your system does pay off in the end. I always incorporate some level of flexibility in my studio designs, audio chains, or wherever I think I can use it as long as it does not degrade performance. This quick solution for our voice booth, and second test of proof of concept for using Dante for microphones, once again confirms this design concept is valid. Be flexible and have fun experimenting! Next time, details on incorporating Dante into the mix. Cheers!
Dante Certified! Level 3
Just wanted to give a quick update. I just completed and passed the level 3 test online for Dante Level 3! Yeah!
I will admit it was not as “easy” as I would have thought with the amount of work done in our facility. I am happy that I did it! Confirms that I maybe possibly really know something, though may not be an expert yet!
If you are out there working your way through any cert or achievement, keep at it. It is well worth it and quite satisfying.
Cheers!
Audio Over IP (AoIP)-Dante
To Audio Over IP or not to Audio Over IP. That should not be the question. The answer is a definitive yes. This should be a decision of adding another layer to the arsenal of audio options toolkit. We all still need analog and digital audio. Just add IP to that kit. Of the options available, from proprietary LiveWire and Wheatnet, to what may be considered standard, the choice is yours. Do not be fooled by AES67 claims. Think about what you want to do and why. I chose Audinate Dante. It compliments what I have and moves us into the future. And for my system it is integrated with Sierra Automated Systems (SAS) 32KD and Bravo. (It even supports AES67.) Choose wisely.
I know you have read about AoIP. I know you know about AoIP. I know you use AoIP. Any modern codec is using AoIP as we all use the Internet to feed audio remotely. The basics of creating an AoIP network is simple. You need a network. The main part of this network is your switch. Do not use a hub. Make it a good switch. Design your network for at least 1 GB. Depending what you decide on a platform, you may need a DHCP server, and possibly some high-end switches. Some will want to Subnet and use VLANs on existing networks. I am of the belief of making things simple, so I chose to create a completely independent and isolated network. I chose Dante.
What makes Dante “simple?” Many things, but the main is the fact it does not require any special hardware. No special switches. No special configurations. In addition to that it does not require DHCP. The IP addresses are automatically assigned by Dante just like the automatic addressing Windows does when a DHCP server is not available. I chose to manually, or statically, assign the IP addresses. To manage Dante, the machine that has the Dante Controller has two NICs (Network Interface Card), so one is assigned an IP address for the Dante network. As the audio in the broadcast facility is contained here alone, there is not need for a gateway. I have 59 devices, so the assignment and manually configuring of the Dante portion may take time, but once it is done, it is done.
You ask about automation and playback computers. Two NICs. Ask me how many times I have been off air with this configuration. I dare you. Zero. Keep that in mind. Each machine has 1GB NICs. All studios have CAT6 cable home runs to the switch. Avoid multiple switches if you can. This is in line with keeping things simple.
And that is the basic framework that I use. Keep it simple. Don’t try and do too much at once. Get used to what you are doing.
Next post will be the basics of Dante. I will cover the Dante Controller basics.
In the meantime, check some Audinate links while you plan your system:
So You’re Adding Dante to Your Network?
Broadcast: Radio
Cheers!
Why Dante by Audinate?
I have mentioned Audio over IP (AoIP) in posts and on my site. I have been using AoIP for years to do remote broadcasts, normally using Tieline codecs, but have used others. I was one of the early adopters. I also decided years ago to run our studio to transmitter audio over IP. Due to space constraints and other factors I decided on the Worldcast/APT codecs. All have worked very well. When the stations had to move I wanted my AoIP platform to be Dante. I am glad I did.
There are three notable choices for AoIP on the broadcast industry: Dante, LiveWire, and WheatNet. Two of these are proprietary and do not have to pointed out. Only one, Dante, is an industry standard most notably in the audio/video industry and live sound. It is used worldwide in major venues. The list goes on and on. Just visit the Audinate Project Gallery. If you need devices and interfaces, why there are a whole slew of choices. Any time you need to interface, just check out their Product Catalog where you can research what you want, but do not pass over Audinate’s own devices, the AVIO adapters. Though I have not needed one, I think next year I will pick up a couple to have for the rainy day emergency! How could I pass on choosing Dante for my platform of choice?
Overall, the installation was a breeze. In my next post I will detail our basic installation, but for now just an overview. Though Audinate is designed to run on your existing Ethernet network, I am a strong believer in keeping mission critical separate, so I installed a completely separate network just for Dante. This makes life super easy as all you need to install is a good core switch and home run all your connections. At this point, as Dante will automatically configure its own IP addresses you can just let it happen. I actually manually assigned all IP addresses. Once you have a couple devices installed, you will see them populate in the Device Manager software. Using the Device Manager, make your audio connections and you are off to the races.
I am a Sierra Automated Systems (SAS) plant. With the new KDL modules and Rio Bravos, interfacing Dante to the routing system is quite easy. Again, you need to make your routes in the Dante Controller first, but once you have them available, that audio is not available in the SAS routers just like any other audio. SAS is working with Audinate such that they can control Dante routing through their system from my understanding. Seems like a complex challenge, but if anyone can do it, SAS can.
Stay tuned from my next post about the details of installing Dante, the devices, and configuration. Being an industry standard makes for easy integration with many devices. Mackie comes to mind. As for up-time, I have not had any issues with our AoIP setup. It works, and that is what counts.
AoIP: Dante by Audinate
Love it. Simple. Just build your network properly.
We are what I would say is 3/4 the way through getting these facilities in a psuedo-complete state. The one thing that I think has been the most reliable is our audio network, Dante AoIP. Simple, efficient, and easy to maintain. I need to do a count, but I am sure I have over 50 devices on this network/system. I know I am not done.
The devices range for KDL modules in my SAS 32KD frame, to SAS Rio Bravos, and a multitude of Dante Virtual Sound Cards (DVS). Using the Dante Controller application makes it very easy to setup, configure, and maintain. After putting all this fun stuff together I decided to visit the Audinate site and check with their online information. I decided to go through the steps and check out the training. I did all this just this past weekend. The end result: I have a Dante Level 2 certification.
I hope to catch up and spend time on some details on why I chose Dante, and how I implemented it. For now, know that I am a pleased Audinate Dante customer.
